


You don't have to wait to be a pro to photograph a night sky or stars. Anyone can do it by only providing a few equipments like DSLR cameras (or any cameras that lets you control the exposure and focus settings manually), a tripod , a shutter release cable and if you want to focus more closer to the stars, add a telescope. But here I just wanna share photographing a sky without a telescope because of course using telescope is quite high in budget.
Choose the location
Plan very carefully. Choose your location to shoot like beside the river or lake, airports, city view, desert and so on. But it is better if it is far away from a bright place that is full with lights. Shooting in a dark place is very nice to catch the sky without any other interruptions from artificial light sources. For better results, make sure you shoot under a full moon or quite bright moon, as the moonlight will enlighten the landscape and it will not appear too dark. But do not point to the moon if you want to make a long exposure shot.
Mount the camera on a sturdy tripod and set carefully
Set the ISO setting at least between 200 to 800. ISO 400 and higher will be noticeably grainier. Turn off the Autofocus and manually set the focus lens to infinity. Set the shutter speed to either the bulb setting, or a range of settings between about 2 and 30 seconds (long exposure). Then point the camera to the desired area, trip the shutter (preferably using a cable release when you use BULB setting, or the camera's self-timer in order to minimize vibration), and keep the shutter open for the desired length of time.
Start shooting
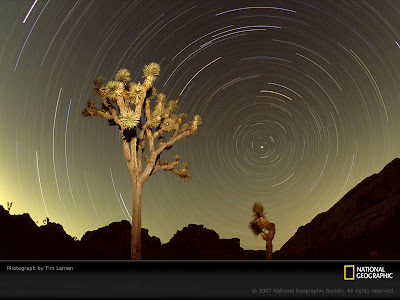 <-- Photo credit to National Geographic
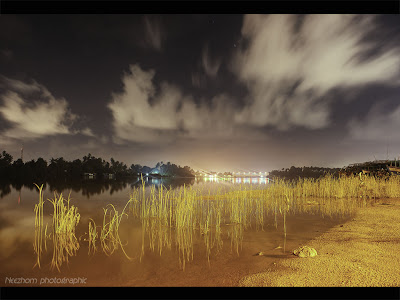
 For a start, just take photos of the stars without landscape. You can later try shooting landscape with the stars after you understand how to play with lights. Open the shutter and wait. How long you keep the shutter open depends on how much ambient light is in the sky. Any star trail photo needs an exposure time of several minutes up to several hours. Even though you can't see the light, if you're near a city, there will be light pollution (it will make your photo overbright) and you won't be able to get long star trails. If you shoot at a very dark place, you can leave the shutter open longer (means longer star trails). The longer the exposure, the longer the trails will be.
Since the Earth rotates, the stars are not at fixed places in the sky but appear to move, more or less towards the west. To photograph the tracks the stars make across the sky (the star trails), of course the camera needs to remains fixed to ground and have it exposed for an appreciable amount of time.
If the exposure is longer than 15 minutes or 30 minutes, I recommend to use ISO 100 to avoid grainier photo. Because the amount of time of those exposures are quite long to catch the ambient lights. Make sure the foreground is not much brighter than the sky, a darker foreground is not a problem for very long exposure. The ambient lights will brighten the foreground.
 You can also make a night cloud as a main subject. Because the cloud is more dramatic with long exposure (they are like moving and alive). Make sure you know the direction of the wind and how fast it is. Place and face your camera to the opposite direction of the wind and you can have a dramatic cloud that seems like moving towards you.
If you don't want to shoot star trails but just want normal stars, make sure you set ISO to a higher setting like 400 and above. But the photo will be grainier as you raise up the ISO speed. And no need to expose long to avoid the stars making trails. This also can be applied if you want to shoot a moon photo especially a full moon. And absolutely you don't have to open the shutter for so long because the moon is already bright. Shutter speed around 1 second is already ok.
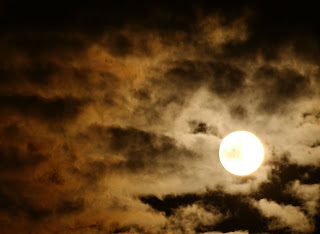
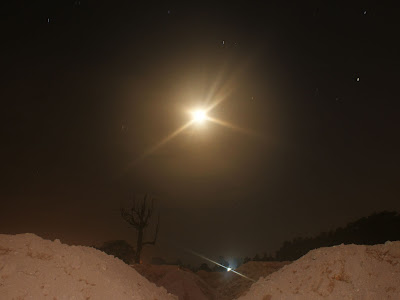 But sometimes, you can also give a long exposure shot to the moon. It will give a flaring effect. Maybe you'll like it too. This is a variation in moon photography. Maybe there are more skills which you can explore into and try.
Since the Earth rotates, the stars are not at fixed places in the sky but appear to move, more or less towards the west. To photograph the tracks the stars make across the sky (the star trails), of course the camera needs to remains fixed to ground and have it exposed for an appreciable amount of time.
If the exposure is longer than 15 minutes or 30 minutes, I recommend to use ISO 100 to avoid grainier photo. Because the amount of time of those exposures are quite long to catch the ambient lights. Make sure the foreground is not much brighter than the sky, a darker foreground is not a problem for very long exposure. The ambient lights will brighten the foreground.
 You can also make a night cloud as a main subject. Because the cloud is more dramatic with long exposure (they are like moving and alive). Make sure you know the direction of the wind and how fast it is. Place and face your camera to the opposite direction of the wind and you can have a dramatic cloud that seems like moving towards you.
If you don't want to shoot star trails but just want normal stars, make sure you set ISO to a higher setting like 400 and above. But the photo will be grainier as you raise up the ISO speed. And no need to expose long to avoid the stars making trails. This also can be applied if you want to shoot a moon photo especially a full moon. And absolutely you don't have to open the shutter for so long because the moon is already bright. Shutter speed around 1 second is already ok.
 But sometimes, you can also give a long exposure shot to the moon. It will give a flaring effect. Maybe you'll like it too. This is a variation in moon photography. Maybe there are more skills which you can explore into and try.
Whatever, you can always write down the best settings that suit with the condition you shoot. The lights, weather, and position of things are always changing (not static). Also with the settings, it will always be different depending on condition.
Extra tips
- The faster the film the brighter your stars will look, but also the more grainy your images. As a minimum, use a 400 speed film, but be very tempted to experiment with specialty films (such as 3200 speed).
- Keep an eye out for dew forming on the lens. You'll also have to abandon your shot if clouds roll in, too much fog or smoke develops or someone shines a light into the lens.
- The earth spins an on axis, if you can find Polaris (the north star), place it in the center of your frame. The star trails will form circles around it.
- If you want to photograph star trails, make sure the moon is not in a frame, or it will make your photo overbright with the moonlight.
- Bring a flashlight and 'light-paint' the foreground in some color. For standard white flashlights, the foreground will become yellow-orange.
- Remember that it takes battery power to hold the shutter open.
- Make sure your camera is in freeze condition. Any movement even a bit will ruin the photo.
- If you want to shoot meteors, keep the shutter open for 2 to 10 minutes. If you're lucky, one or more meteors will cross the camera's field of view during that time. If not, try again and again .......
Resources:
- From my own experience, readings and discussing
- http://howto.wired.com/wiki/Photograph_the_Stars
- http://www.weatherscapes.com
Categories:
Photography


1 comments:
Thanks Neezam For Tips about "How to photograph landscape with the night sky and stars"
Post a Comment